Untitled self-indulgent website
Website for George H. Williams
Project maintained by Hosted on GitHub Pages — Theme by mattgraham
Adding tabbed content to IntranetmainUserblock, IntranetCirculationHomeHTML, IntranetReportsHomeHTML
This is an update to a presentation I did at the koha-US conference in 2017 in Coeur d’Alene, Idaho
When I worked for the VALNet consortium we had a lot of content we needed to store somewhere easy for library staff to access. There were some reports that were run monthly at various libraries and there were notices about school closures for the summer, and there were other things that seemed important to make available for staff.
The IntranetmainUserblock system preference seemed like a great place to store those things. The problem was that we had so much content we wanted to share, especially relating to annual summer school closures, that at certain times of the year the home page could become 5 miles tall.
One day I though, wouldn’t it be cool to set that up as tabbed content. School closures on one tab, reports on another, maybe a blog or calendar on a third. This led to an investigation of tabbed content and I found a great, pre-built, tabbed content with only Java / CSS page template on GitHub written by Shaun2D2 - Shaun2D2 at GitHub - specifically this gist.
This is an example of this code written for the IntranetCirculationHomeHTML preference with some added comments describing what the different lines are doing.
One thing I have changed with this code is that the original code uses “tabs” as it’s main ID name. In Koha on of my fears is that in some future release something in Koha will use an id name like “tabs,” so when I use this for IntranetmainUserblock, I change “tabs” to “mainTabs,” for IntranetCirculationHomeHTML I change “tabs” to “circTabs,” and for IntranetReportsHomeHTML I change “tabs” to “reportTabs.” This makes it unlikely that future versions of Koha will incorporate the same id names. A search/replace for “mainTab” allows you to easily update the tab ids.
Below is the code with some commentary on what most parts do:
<style type="text/css">

  /* Controls the position of the tabs relative to the content */
  ul#mainTabs {
    list-style-type: none;
    margin: 30px 0 0 0;
    padding: 0 0 0.3em 0;
  }

  /* Puts the tabs side-by-side instead of on top of each other */
  ul#mainTabs li {
    display: inline;
  }

  /* Makes the tabs look like tabs instead of links at the top of the content */
  ul#mainTabs li a {
    color: #42454a;
    background-color: #dedbde;
    border: 1px solid #c9c3ba;
    border-bottom: none;
    padding: 0.3em;
    text-decoration: none;
  }

  /* Tabs change color when the mouse hovers over them */
  ul#mainTabs li a:hover {
    background-color: #f1f0ee;
  }

  /* The selected tab is a different color with bold font */
  ul#mainTabs li a.selected {
    color: #000;
    background-color: #f1f0ee;
    font-weight: bold;
    padding: 0.7em 0.3em 0.38em 0.3em;
  }

  /* Draws the box around the content for the selected tab */
  div.mainTabContent {
    border: 1px solid #c9c3ba;
    padding: 0.5em;
    background-color: #f1f0ee;
  }

  /* Defines the position of the content inside of the selected tab */
  div.mainTabContent {
    padding: 2% 2% 2% 2%;
  }

  /* Hides the content for the tabs that aren't selected */
  div.mainTabContent.hide {
    display: none;
  }

</style>

<script type="text/javascript">
  //<![CDATA[
  var mainTabLinks = new Array();
  var contentDivs = new Array();

  function init() {
    // Grab the mainTab links and content divs from the page
    var mainTabListItems = document.getElementById('mainTabs').childNodes;
    for (var i = 0; i < mainTabListItems.length; i++) {
      if (mainTabListItems[i].nodeName == "LI") {
        var mainTabLink = getFirstChildWithTagName(mainTabListItems[i], 'A');
        var id = getHash(mainTabLink.getAttribute('href'));
        mainTabLinks[id] = mainTabLink;
        contentDivs[id] = document.getElementById(id);
      }
    }
    // Assign onclick events to the mainTab links, and
    // highlight the first mainTab
    var i = 0;
    for (var id in mainTabLinks) {
      mainTabLinks[id].onclick = showmainTab;
      mainTabLinks[id].onfocus = function() {
        this.blur()
      };
      if (i == 0) mainTabLinks[id].className = 'selected';
      i++;
    }
    // Hide all content divs except the first
    var i = 0;
    for (var id in contentDivs) {
      if (i != 0) contentDivs[id].className = 'mainTabContent hide';
      i++;
    }
  }

  function showmainTab() {
    var selectedId = getHash(this.getAttribute('href'));
    // Highlight the selected mainTab, and dim all others.
    // Also show the selected content div, and hide all others.
    for (var id in contentDivs) {
      if (id == selectedId) {
        mainTabLinks[id].className = 'selected';
        contentDivs[id].className = 'mainTabContent';
      } else {
        mainTabLinks[id].className = '';
        contentDivs[id].className = 'mainTabContent hide';
      }
    }
    // Stop the browser following the link
    return false;
  }

  function getFirstChildWithTagName(element, tagName) {
    for (var i = 0; i < element.childNodes.length; i++) {
      if (element.childNodes[i].nodeName == tagName) return element.childNodes[i];
    }
  }

  function getHash(url) {
    var hashPos = url.lastIndexOf('#');
    return url.substring(hashPos + 1);
  }
  //]]>
</script>

<body onload="init()">

  <h1>Main heading</h1>

  <!-- HTML for the tabs at the top of the page - if you make one of these tabs hidden, the content of that tab will be hidden-->
  <ul id="mainTabs">
    <li><a href="#tabR01">Tab 1</a></li>
    <li><a href="#tabR02">Tab 2</a></li>
    <li><a href="#tabR03">Tab 3</a></li>
    <li><a href="#tabR04">Tab 4</a></li>
    <!-- The content for this tab will be hidden -->
    <li><a href="#tabR05" style="display:none;">Tab 5</a></li>
  </ul>

  <!-- TABR 1 -->
  <div class="mainTabContent" id="tabR01">
    <h2>Tab 1</h2>
    <div>
      <h3>Heading</h3>
      <p>Paragraph</p>
    </div>
  </div>

  <!-- TABR 2 -->
  <div class="mainTabContent" id="tabR02">
    <h2>Tab 2</h2>
    <div>
      <h3>Heading</h3>
      <p>Paragraph</p>
    </div>
  </div>

  <!-- TABR 3 -->
  <div class="mainTabContent" id="tabR03">
    <h2>Tab 3</h2>
    <div>
      <h3>Heading</h3>
      <p>Paragraph</p>
    </div>
  </div>

  <!-- TABR 4 -->
  <div class="mainTabContent" id="tabR04">
    <h2>Tab 4</h2>
    <div>
      <h3>Heading</h3>
      <p>Paragraph</p>
    </div>
  </div>

  <!-- TABR 5 -->
  <!-- This is the content for the tab that's hidden in this example - if you remove the content -->
  <div class="mainTabContent" id="tabR05">
    <h2>Tab 5</h2>
    <div>
      <h3>Heading</h3>
      <p>Paragraph</p>
    </div>
  </div>
  <!-- END -->
</body>
The way to use this code is to open Koha and go to Home > Administration > System preferences. Once there you’ll want to find the system preference for the page you want to add the content to. Currently you can add this to:
| Page | Preference |
|---|---|
| Staff interface home page | IntranetmainUserblock |
| Circulation home page | IntranetCirculationHomeHTML |
| Reports home page | IntranetReportsHomeHTML |
If you have any content already in one of these preferences, you’ll want to put this code after the content, or incorporate that content into one of the tabs you’re creating.
Once the code from above is in the preference, then you need to rename the tabs and add the content in HTML to get it to do and say what you want it to say.
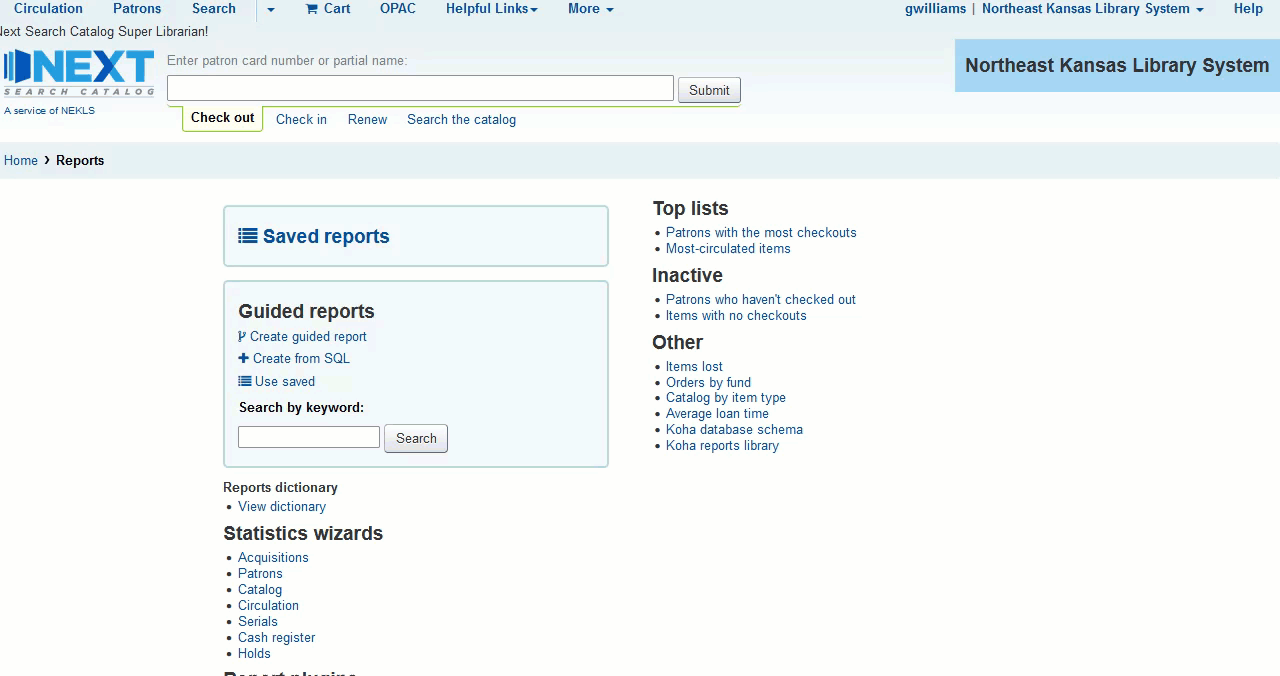
Here is a screenshot of how this looks on the Reports page for Next Search Catalog
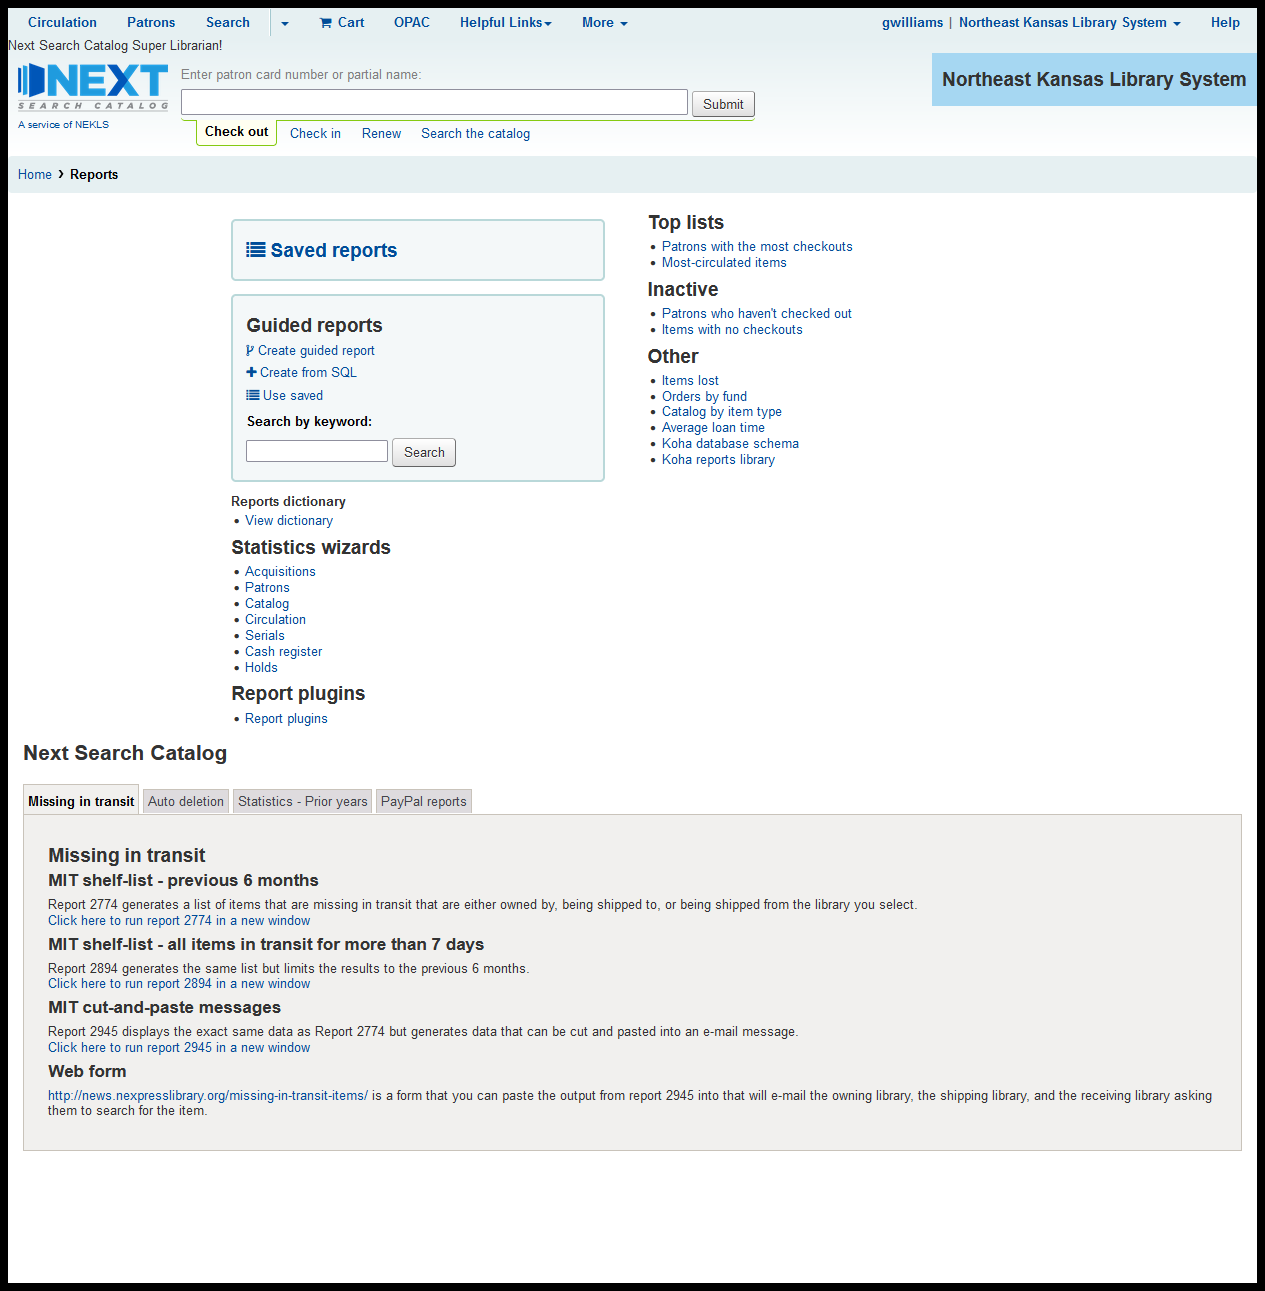
And here is a screenshot of the tabs in action on the Reports page for Next Search Catalog